Showing posts with label Container Gardening. Show all posts

Thursday, May 31, 2012

Growing Carrots in Containers - A Tutorial

We have a limited amount of space in which to garden each year, and one of the simple innovations that allowed me to maximize the return on that space was planting carrots in pots.  Carrots like a nice light dirt, and are prone to being eaten by lots of nasties that live under sod.  You can visit my original carrots-in-containers post here if you'd like to know more, but this post will be a step-by-step photo guide to the entire process, from preparing a container to harvesting your carrot crop!


STEP 1:  Gather your supplies.  You'll need potting soil, carrot seeds, a large , deep bucket, a drill and anything you normally use for potting plants.  If you're using a planter, make sure it's deep enough for the type of carrots you hope to grow and semi-straight (you can also skip the next few steps since planters will already have drainage holes).

STEP 2:  Drill holes in your bucket around the bottom sides and all over the bottom .  Carrots  need drainage just like anything else planted in containers.    

Your bucket should look something like this when you are done.   

STEP 3:  Fill the container almost to the top with high-quality potting soil.  I leave about 3 to 4 inches of space at the top.  Do not pack down your dirt, as carrots like a nice loose soil, and make sure to break up any clumps.

STEP 4:  Lightly and casually sprinkle about half of a packet of carrot seed on top of the potting soil.  Try to  make sure there are some seeds all over the top of the dirt and don't worry if it seems like there are too many.  Carrot seeds need to be planted with a very small amount of soil on top, so you can either take your finger tips and sort of mess up all the seeds and the dirt at the surface, then lightly pat down, OR you can take a cup of dirt and lightly sprinkle about a 1/4 inch layer over the carrot seeds before lightly patting down.  It's up to you!  Don't over think this part, it's hard to screw up.

STEP 5:  Take a small piece of garden fabric (I use burlap) and press it down onto the newly planted carrot container.  This protects your seeds from birds AND from being moved around too much by the water spray, while also helping them keep moist.  You can skip this step if you want, but I have had much better germination using some kind of cover.  Water your container thoroughly with a gentle spray.  Remember, carrot seeds are TINY.


STEP 6:  Check under your cover everyday, and remove it permanently at the first sign of baby carrots germinating.  

Your carrot container will look something like this after a couple of weeks.  If the carrots aren't distributed very evenly, just make sure to try and sprinkle the carrot seeds more evenly next time.  

STEP 7:  Try to thin your carrots when they are a few inches tall.  I pull mine entirely out, but you can also pinch them off if you find that this disturbs the soil too much.   Try to leave enough space around each carrot to allow it to grow to the thickness of the variety you planted.

A few weeks before harvest your buckets will be filled with tall bushy carrot tops!  

STEP 8:  Pull your carrots!  You can sweep away the dirt at the top of your carrots to check on how big they are getting. Harvest according to the variety you planted.  I pulled these all at once, but you can leave some carrots in the buckets and harvest as needed.  You may not want to do that if you need the container to re-plant, but that's why I have 6 buckets in various stages of growth at all times!


With the addition of compost tea or another fertilizer, you can use the potting soil for multiple years and get several harvests a year!  You may have to pull some weeds the second year, but they are usually not as deep or established as ground weeds.   Growing carrots in pots or containers is also a good way to avoid other common carrot pests like carrot root fly.

Tuesday, April 3, 2012

Planning an Accessible Garden

I had been planning on updating this over the weekend, but we ended up dealing with some unexpected issues that have delayed things a bit.  Even now I haven't really been out in the garden today, so I'm throwing myself into planning one of the really exciting gardening projects I've been offered this season!

My husband works with a non-profit that helps disabled individuals live their lives.  The house he works in has a beautiful yard and the gentlemen in the house tend to eat less-healthily than they otherwise could due to the tight food budget.  I offered to stop over once a week with the kids and maintain a small food garden at the house.  All the current workers would have to do was water it and harvest things that are obviously ripe.  The gentlemen in the house would benefit from the interaction with the kids, the time outside, and the fresh food they grew themselves.

The biggest problem with this plan, is the start-up cost associated with a garden.  The house operates on a pretty tight budget, and garden tools and soil for raised beds aren't exactly things that provide a quantifiable benefit as quickly as most other household expenditures.   I can spare some seeds, and barring that each of the men in the house has a food stamp allotment due to their disability that can be used for plants and seeds, but we're still going to have to get creative with everything else.

I have a much larger post about barriers to gardening that I'll be posting soon as a result of this process.  Tomorrow we have a trip to a local farm with the younger kids so that should be fun.  

Monday, March 19, 2012

Spring Garden Cleaning and Planting

Wow, these last few days have been just beautiful and I've managed to get most of the spring garden totally planted.  A few things might be going in a tad early, but I think I can battle any small frosts with mulch and/or row covers.

This is the first time I've ever tried growing lettuce or chard, so it's a total unknown.  I was extra careful to pull out every inch of invasive root growing through my beds in the hopes that I won't have as bad of a weed problem this year.  It's mind-blowing that those roots were even growing into the clay level about 10 inches down...

Anyway, I'll put up the garden plan soon, but in the mean time here are some pictures of progress from the last few days:

Part of the cleaning was pulling up the remains of last year's brassica bed.

Mr. Smiley in front of the garlic bed.

Baby Nugget just sat around eating crackers while the rest of us worked.

Picking rocks out of beds was a popular task.

At one point we had some music in the garden.

The carrots will again be grown in buckets and were actually the first things we managed to plant.

Digging out weeds.

Watering carrots.

The triangle bed will have lettuce and chard this year.

Cabbage and brussel sprouts (a tad close since we will probably lose a few).

Sunday, January 1, 2012

End of the Season Garden Pictures You May Have Missed Since I Didn't Post Them.

Here are the end-of-season harvests and garden pictures taken during my blogger hiatus:


Six types of eggplant!

It's hard to see what happened here, but this is my row of huge bushy tomatoes after it fell over.  The welds on my tomato cages just gave out and collapsed into a mess of metal stakes and hoops.  Clearly I need to use something else next year.

Harvesting in the rain gives everything a nice glossy look.

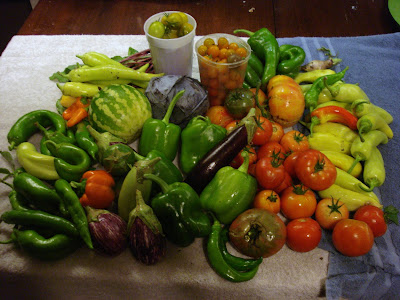
This was definitely the year of the pepper.

Carrots in buckets were a complete success!

The kids were very excited about the different colors.

They would BEG to go harvest carrots.

I really don't remember what type these are, but they tasted good and were 4-6 inches long.

I will buy another packet of these rainbow carrots to keep the kids interested, but they honestly didn't taste much different than the orange carrots.

This year's pitiful onion harvest.

The broccoli is actually still sending off shoots that we pick now and then.  The weather here in Pittsburgh has been unseasonably warm.

One of the last harvests.  There were a ton of baby peppers on the vines when the first killing frost hit.

My Turkish Orange eggplant took FOREVER to ripen anything.

The harvest when we pulled most of the pepper and tomato plants.

Heirloom tomatoes in various stages of ripening.

A small, late garden harvest.

This is the final "harvest" from mid-November.  Beet greens, a few peas and carrots (even ball shaped ones) that I missed earlier, a handful of mostly-ripe Turkish Orange Eggplants and some peppers that somehow survived multiple killing frosts.   I'm not sure those broccoli plants will ever die.

I know I missed quite a few harvests, but this is a good overview of those last few months.  The weather that was so uncooperative this past spring really seems to have worked out well in terms of garden production this fall.  We could have planted several things that I just didn't think we'd have time for....oh well.

Sunday, August 21, 2011

Eggplant Update

Well my little eggplant seedlings from Garden Dreams have finally pulled through and started carrying fruit.  Granted the plants are quite small and stunted (probably from the HORDES of flea beetles we seem to have been cursed with this year) but it looks like I'll get at least one nice harvest of multicolored eggplant goodness in the near future.  

Beatrice Eggplant

My Turkish Orange STARTED FROM SEED!  This is probably the only thing I started indoor  this spring that is still alive.  No where near setting fruit, and quite chewed on, but making progress none-the-less.

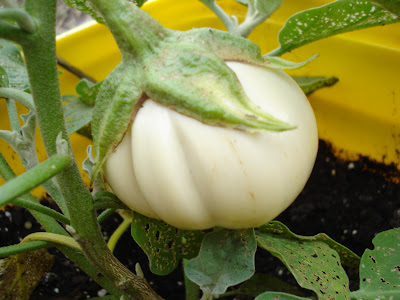
White Thai Ribbed Eggplant

Zebra Eggplant

Kermit Eggplant

Louisiana Long Green Eggplant

Calliope Eggplant

Another Calliope Eggplant...this one is quite a bit darker for some reason.

Wednesday, August 10, 2011

Pittsburgh Children's Museum Garden: Who knew?

Today we took a largely unplanned trip to the Pittsburgh Children's Museum and I had the pleasure of being able to photograph a really cool little educational veggie garden set up in front of the Museum!  Here's a quick photo tour that highlights some really neat ideas that I just might need to steal next year.

The garden is mostly raised beds and containers made from clay drainage pipes (or something like them).  It is situated in a little outdoor nook between the registration lobby and the gift shop.

I'm not big on fruitless flowers, but these are really pretty.  They were probably planted among the veggies to attract pollinators.

Is this purple broccoli in the front?  Or something else...I just don't know.

This faux (or real) log was planted with several herbs.  The vertical clay pipes were also planted with herbs and small veggies, and surrounded a long raised bed.  Such a cool idea!  

Brussel Sprouts

An Asian eggplant of some type.

Another beautiful and healthy eggplant...much healthier than my own at least.

Rain barrels!  They had a rotating composter too but I think I only snapped it in the background once or twice.  

More clay pipes were used as planters along the wall further in.  There are also some amazing  rough hewn wooden benches to sit on.

I just can't get over what a great idea those pipes are.  I have probably seen a ton of them laying around and never thought twice about using them in the garden.  Being square makes them quite a bit more useful than the round pots as they can be used as a border or lined up against each other for more stability.

A view from the end of one of those wooden benches.  The raised beds were quite high off the ground.  You can see a tiny bit of the city skyline in the background.

This is the best shot I could get of the long bed created with a border of clay pipe containers.  

A beautiful heirloom that I didn't see a tag for.

Tomatoes on the same plant but less ripe.  I MUST grow some like this next year.

Chard  :)

This photo is on the way home.  You can tell how many kids probably feed these squirrels.  This fat little guy didn't even blink when my son walked 2 feet from him.

This one just sat a few feet above us quietly observing.

A view of the beautiful day we had here from the car ride home.  I shot that through my windshield (while my husband drove) if you can believe it.

The Pittsburgh Children's Museum Garden itself actually has a blog, which you can find here if you'd like to take a look.  They host several educational workshops for kids and schools, though I've never been to one since we just discovered this garden today.  I love finding new gardens around town :)